Monitoring for UDM Pro
Overview
Monitoring for UDM Pro is a new chargeable add on module for UDM Pro. Within UDM Pro you can see in the devices screen when the phone last checked in but that depend on the activity on the phone and the frequency of polling for that device. This is not a very accurate way of identifying availability nor does it indicate if the device has signed out. There is no alert sent to say when the device hasn’t been seen either.
This is where Monitoring for UDM Pro comes in. By selecting a UDM Pro Tag to monitor and setting a device not seen alert you can receive an email when the device fails to be found on the network.
IMPORTANT
Before starting all devices need to be enabled to use the the device REST API. For the REST API to work the default Admin password must be changed, in most cases you will have already changed the Admin password. To setup the device for REST API follow the instructions on the REST API for reboot page. The latest Polycom firmware requires the REST API to be enabled. BEFORE MONITORING WILL WORK the settings need to have been sent to the devices.
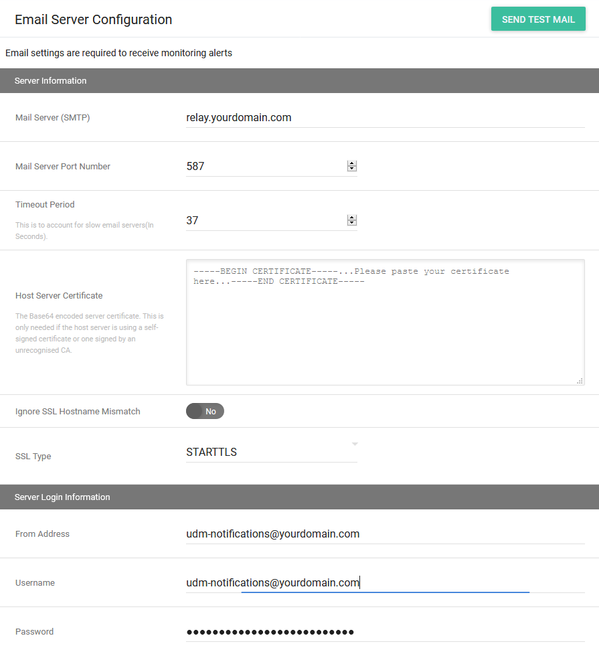
Email Server Configuration
Select the settings menu from the top right of your UDM Pro screen. Then scroll down to Email Server Configuration.
You can either select use internal email server to send alerts from the Enoten domain or enter your own mail relay server.
The fields on this screen to complete are:
| Field Name | Description | Required? |
|---|---|---|
| Mail Server (SMTP) | The FQDN of your mail server to be used to relay the messages | Yes |
| Mail Server Port Number | The port required to send SMTP emails. Default 25 | Yes |
| Timeout Period | How long the UDM Server will wait without receiving a response before timing out. Default 60 seconds | No |
| Host Server Certificate | The Base64 encoded server certificate. This is only needed if the host server is using a self-signed certificate or one signed by an unrecognised CA. Most likely for on-premise installations. | No |
| Ignore SSL Hostname Mismatch | For secure connections ignore problems where the hostname and certificate do not match. Most likely for on-premise installations. | No |
| SSL | If the server requires SSL/TLS connections select the type. If you turn this on the port number will normally be different to port 25. | No |
| From Address | The email address to use in the from field of the email | Yes either "From Address" or "Username/Password" |
| Username | Logon username for servers that require authentication | |
| Password | Logon passwordfor servers that require authentication |
Once you have completed the details and you have applied them, press the SEND TEST EMAIL button. You will be prompted for a To Address enter your email address you want to receive the test from.
You will either receive a "Successfully sent the test email" or an error with the debug information. If you receive an error please review the debug information to see if you can determine the problem with your configuratrion. If you cannot work out the problem please contact support@enoten.com with the debug information for assistance.
Having completed the setup of the mail server you can move on to the setup of the monitor.
Setup Monitor
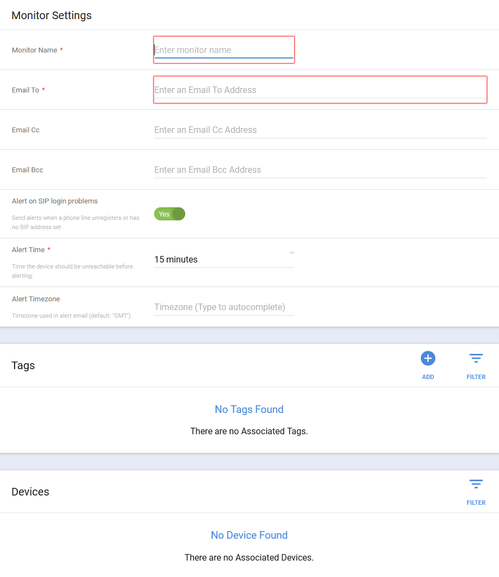
Go to the Monitoring option in the portal and select Add to create a new monitor. You can create one alert or multiple alerts depending on your requirements.
The fields on this screen to complete are:
| Field Name | Description | Required? |
|---|---|---|
| Monitor Name | Friendly name for your monitor | Yes |
| Email To | List of email addresses separated by ; to be sent the email | Yes |
| Email CC | List of email addresses separated by ; to be copied on the email | No |
| Email BCC | List of email addresses separated by ; to be blind copied on the email | No |
Alert on SIP login Problems | An alert is sent if the phone unregisters or has no SIP address set. | No |
| Alert Time | The number of minutes a device should not have been seen before an alert is sent | Yes |
| Alert | Timezone used to for times within the email alert | No |
The final step for completing monitoring is to click the ADD tag button to add the tags that contain the devices you wish to be alerted on.
You can now save your changes and the alert will be active.

